Premises: Homes, Lots and Units
A premise is a place you serve or could serve, with or without a customer: its address, equipment, tickets and every customer who was there. Add them one by one, as a numbered range or from a spreadsheet.
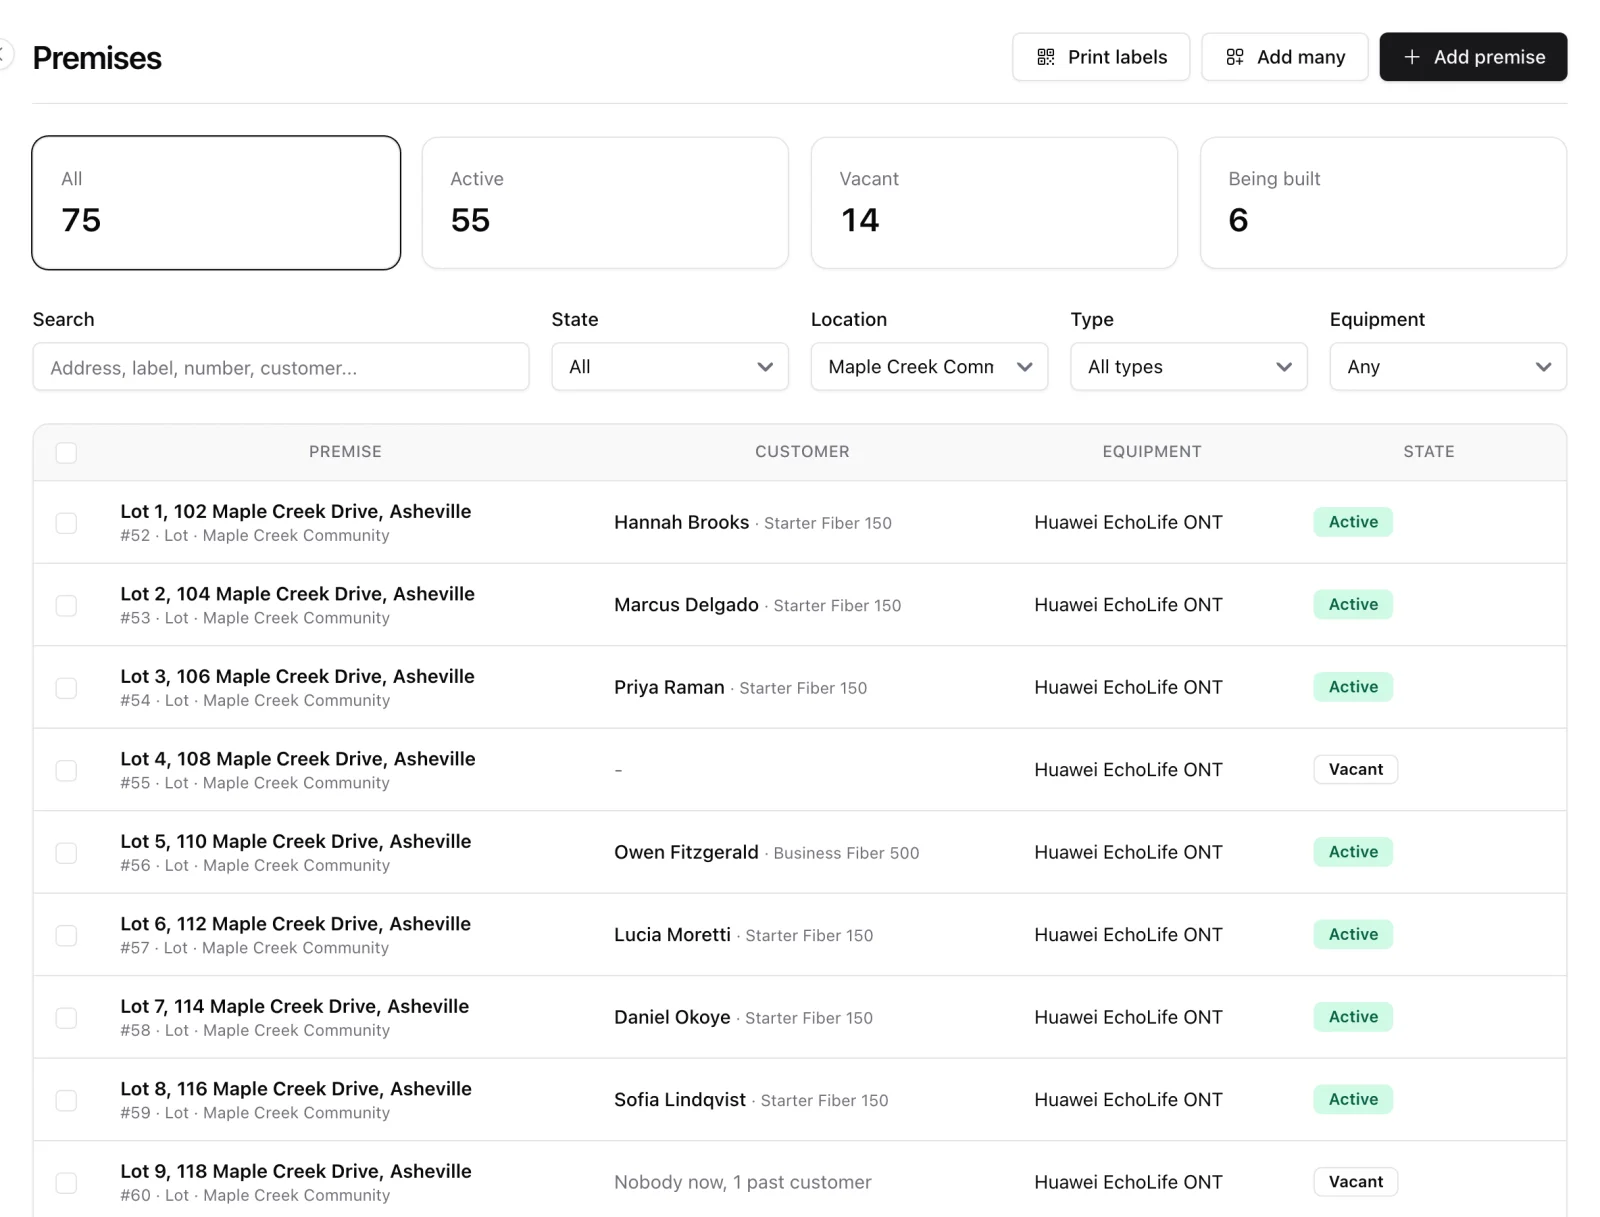
A premise is a place you serve or could serve: a house, an apartment, a lot in an RV park, a shop. It exists whether or not somebody is a customer there. That is the difference from a service, which belongs to a customer and ends when they leave. The premise stays, and with it the address, the equipment installed there, the tickets and every customer who lived there before.
Use premises when you build ahead of sales (fiber to every home in a new community), when residents change often (parks, apartments, seasonal lots) or when you simply want one page per address. If you do not need them, nothing changes: a service can still be created without a premise.
1. Where to find it
Open Sites & Equipment > Premises in the side menu. The four cards at the top count all premises, the active ones (a service is running there), the vacant ones (ready, nobody connected) and the ones still being built. Click a card to filter the list.
Each row shows the address, who is connected and on which plan, which devices are installed there, and the state. Search works on the address, the label, the premise number and the customer's name. The filters narrow the list by state, location, type and by whether a device is recorded there, which answers "which homes still need an ONT" in one click.
Rows are grouped under a heading per location. A dot next to the equipment shows whether the network sees it: green online, amber seen before, red never seen. The equipment filter Device not seen for 7 days lists the premises to check before a season opens or a resident moves in.
2. States
You set a status by hand; the rest is worked out from the services.
- Planned - on the plan, nothing built yet.
- Under construction - the drop or the equipment is being installed.
- Ready - service can be delivered. A ready premise shows as Active while a service runs there and as Vacant when none does. You never set Active or Vacant yourself.
- Cannot be served - surveyed, not possible.
- Retired - no longer in use. Its history stays.
3. Add one premise
Click Add premise. A premise needs a label (Lot 14, Apt 3B) or a street address, and can have both. Pick the type, the location it belongs to and the status. Under More you can put it inside a building, set the map position, write access notes (gate code, dog in the yard) and record the manager or owner of the place.
Buildings are one level deep: create the building as a premise of type Building, then pick it under "More" on each unit.
4. Add many at once
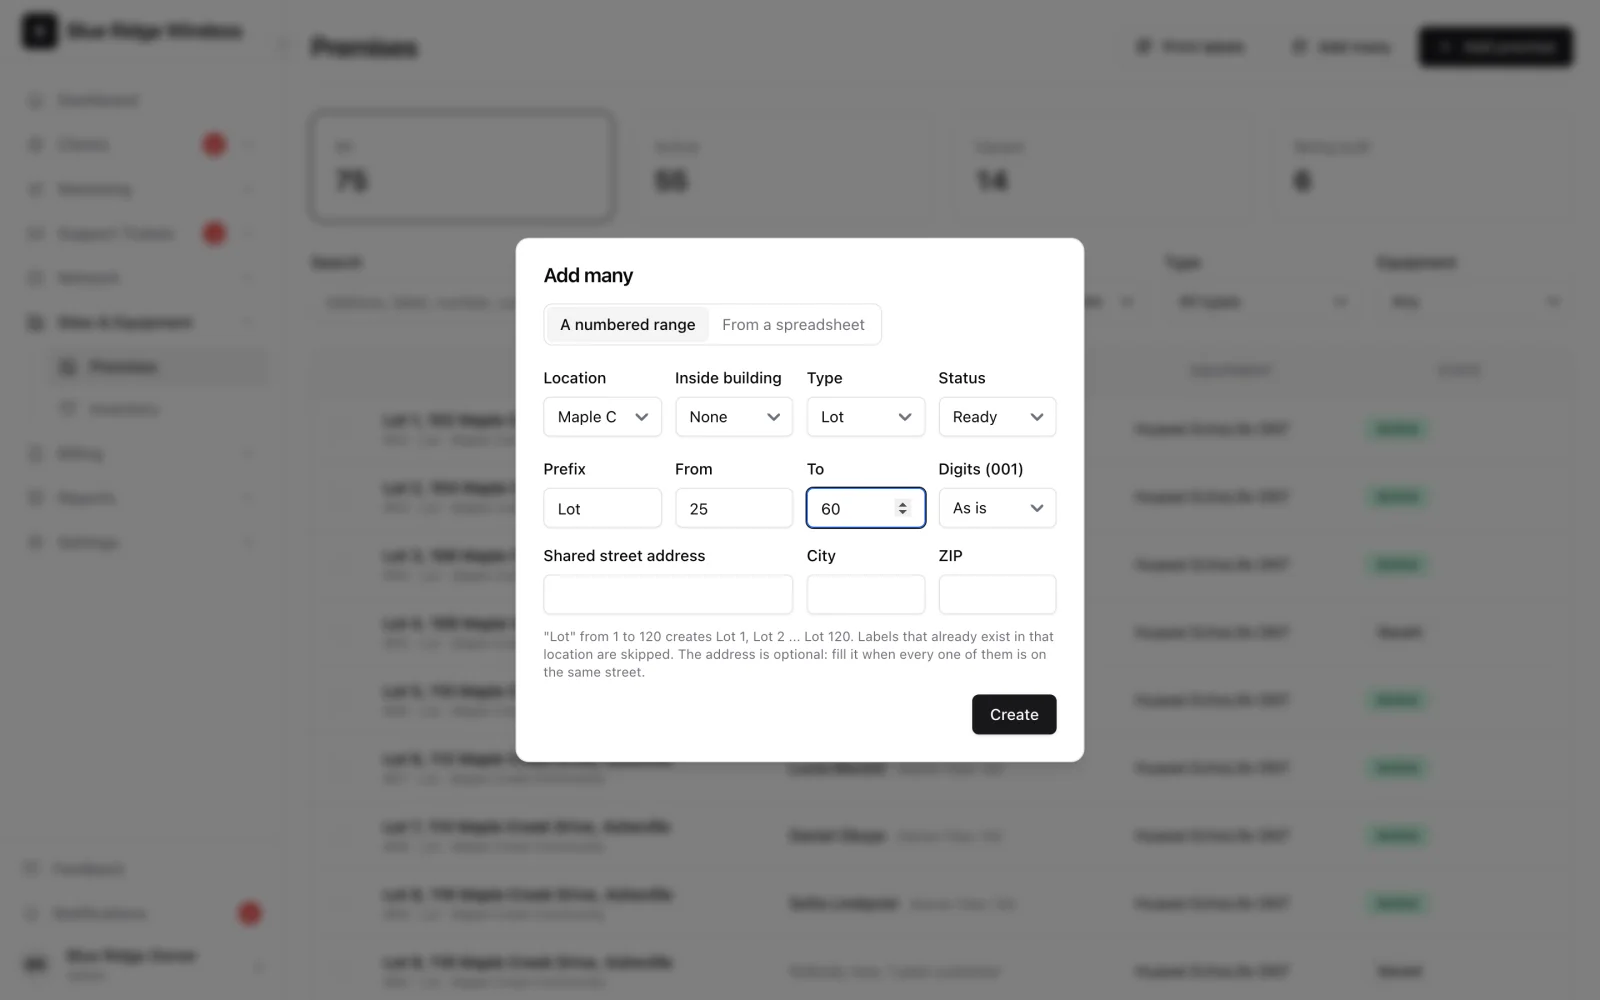
Add many has two modes.
- A numbered range - a prefix and two numbers create "Lot 1" to "Lot 120" in one go, up to 2,000 at a time. Choose the location, the building, the type and the status they all share. Labels that already exist in that location are skipped, so running it twice does no harm.
- From a spreadsheet - upload a CSV file or paste rows with a heading line. Headings are matched loosely: Label, Lot, Unit or Apt; Address or Street; City or Town; ZIP or Postal code; Lat and Lng; Status; Type; Access notes; Manager name, phone and email. Rows without a label and an address are reported by row number and skipped; a status that is not recognised is reported and the default is used. Up to 5,000 rows per file.
5. Change many at once
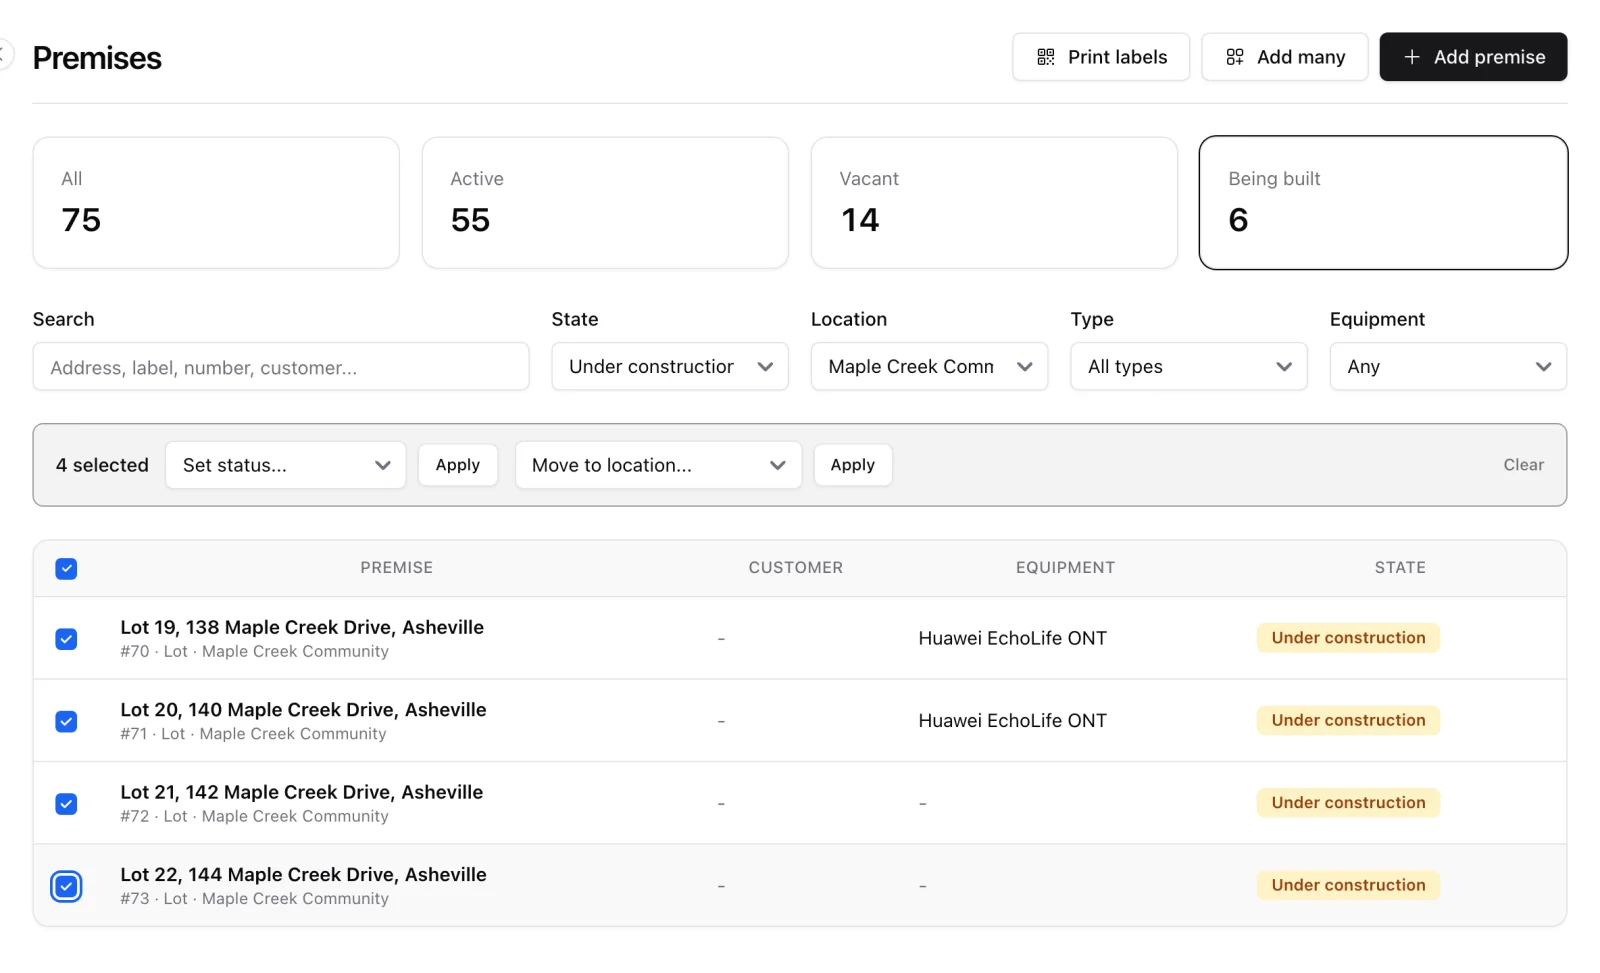
Tick the rows (or the box in the table heading for the whole page). A bar appears with Set status and Move to location. This is how a street of homes goes from "Under construction" to "Ready" the day the crew finishes.
6. The premise page
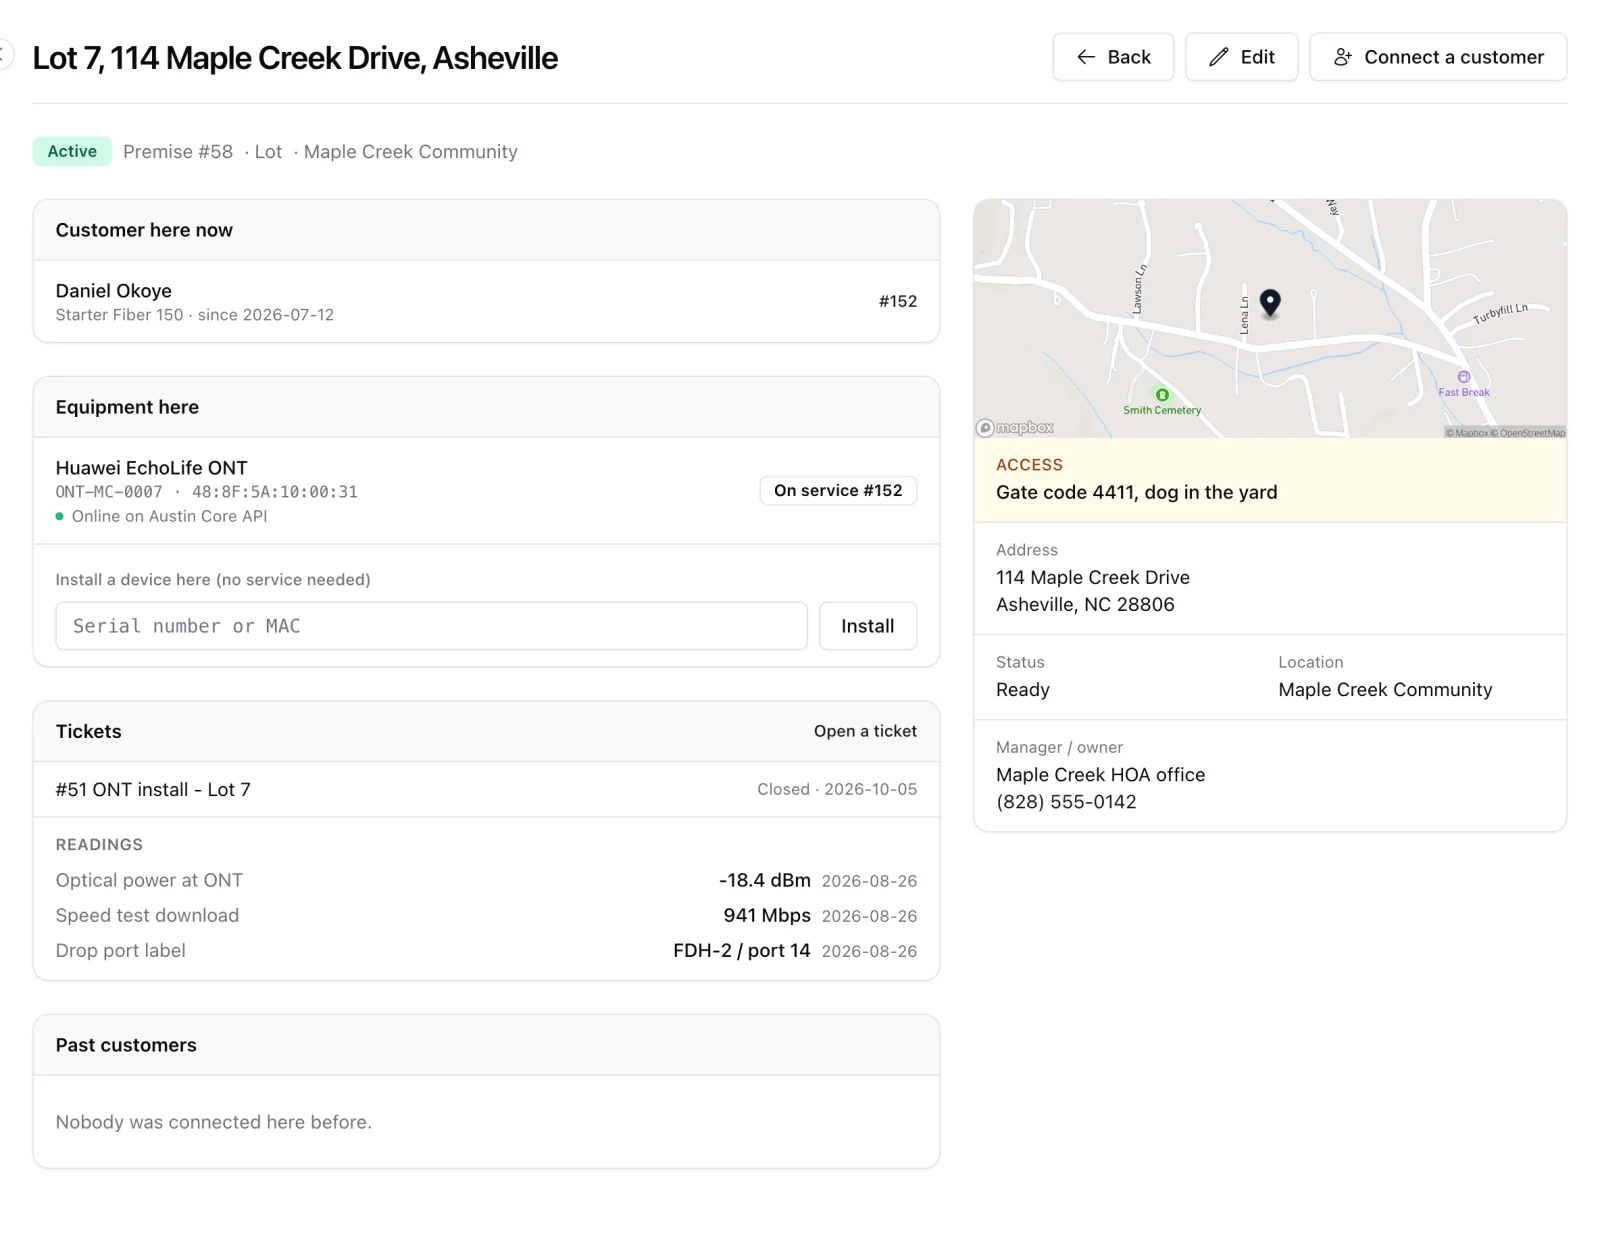
Click a premise to open its page.
- Customer here now - the running services with the customer and the plan.
- Equipment here - every device recorded at this address, on a service or not, and whether the network sees it. See Equipment at a Premise.
- Tickets - work done at this address, with the readings taken during installs.
- Past customers - who was connected before, from when to when.
- On the right: the map, the access notes, the address, the status, the location and the manager's contact.
Edit opens the details in a dialog. When you change the address of a premise, the install address of the services there follows. Deleting is only possible for a premise that never had a service and holds no units or equipment; anything else you mark as Retired so the history stays.
Two entries for one place
An import next to a hand-made entry sooner or later gives one address two entries. When another entry has the same street address, the premise page says so at the top and offers Merge it into this one: the customers, equipment, tickets and history of the other entry move here, blanks on this one are filled from it, and the other entry is removed. "Dr" and "Drive", "St" and "Street" are read as the same. To merge two entries the page did not spot, use Edit > Merge into another and pick the one to keep.
7. Connect a customer
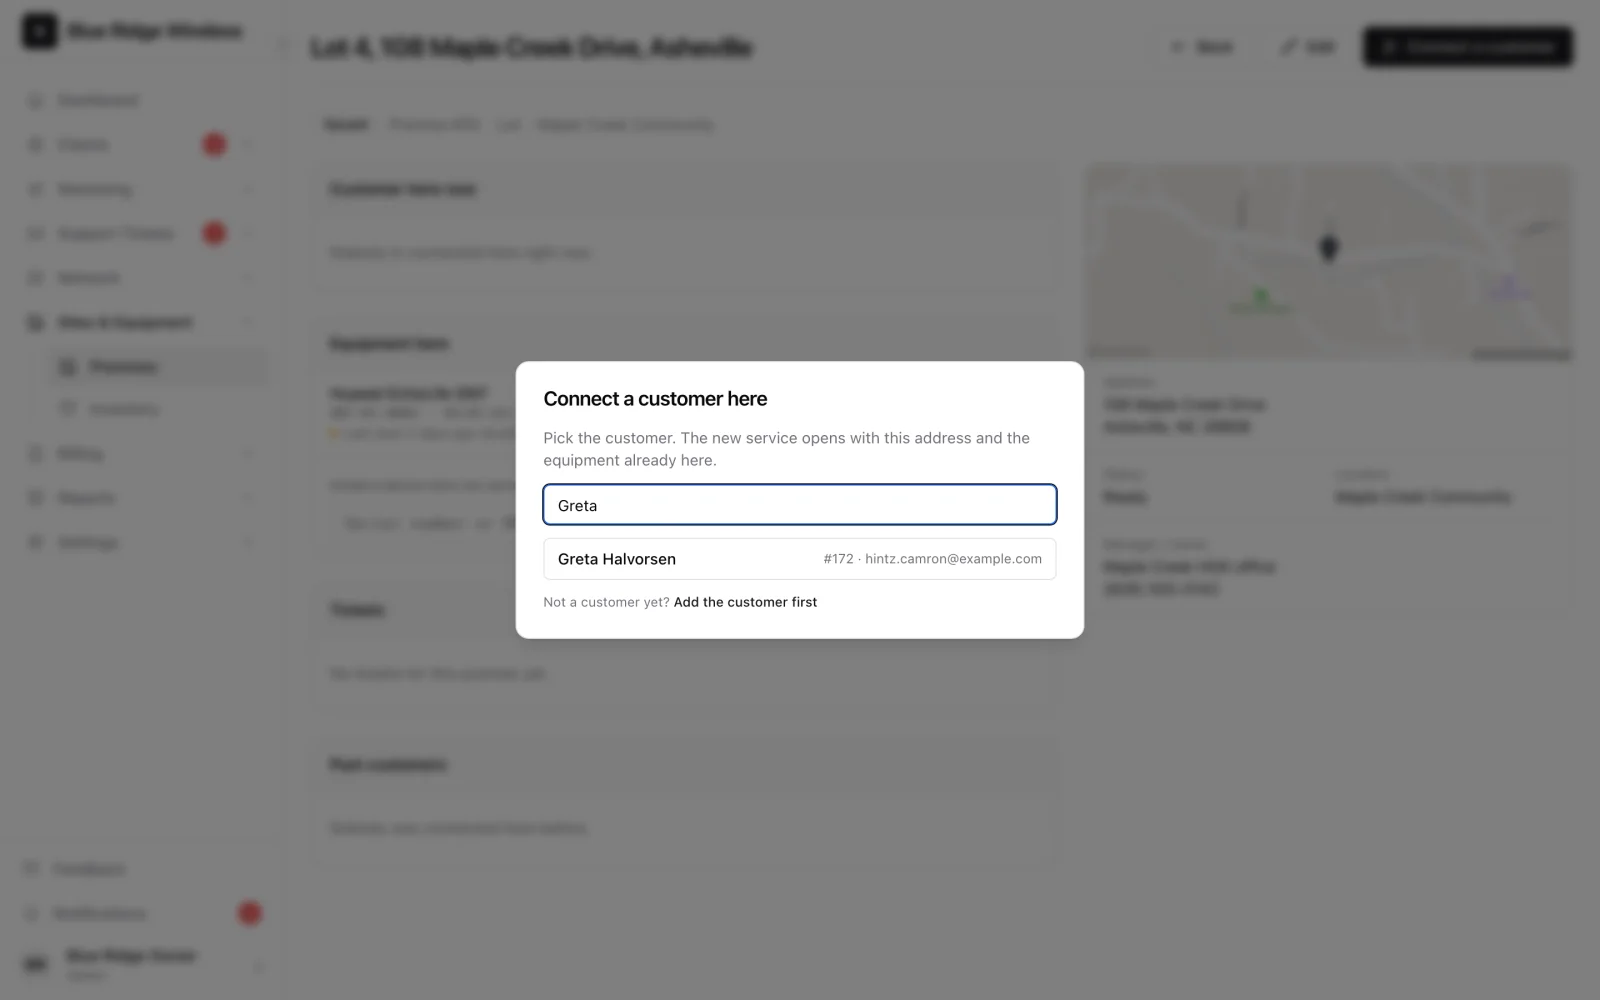
On a vacant premise the main button is Connect a customer. Search for the customer and pick them: the new service form opens with this premise already chosen. When the service is saved it takes the premise's address, and any device already installed there is attached to it by itself.
You can also start from the customer. On the new service form and on the service page there is a premise field: search by address, label or number and pick. On an existing service the choice is saved the moment you pick it.

8. Start from the addresses you already have
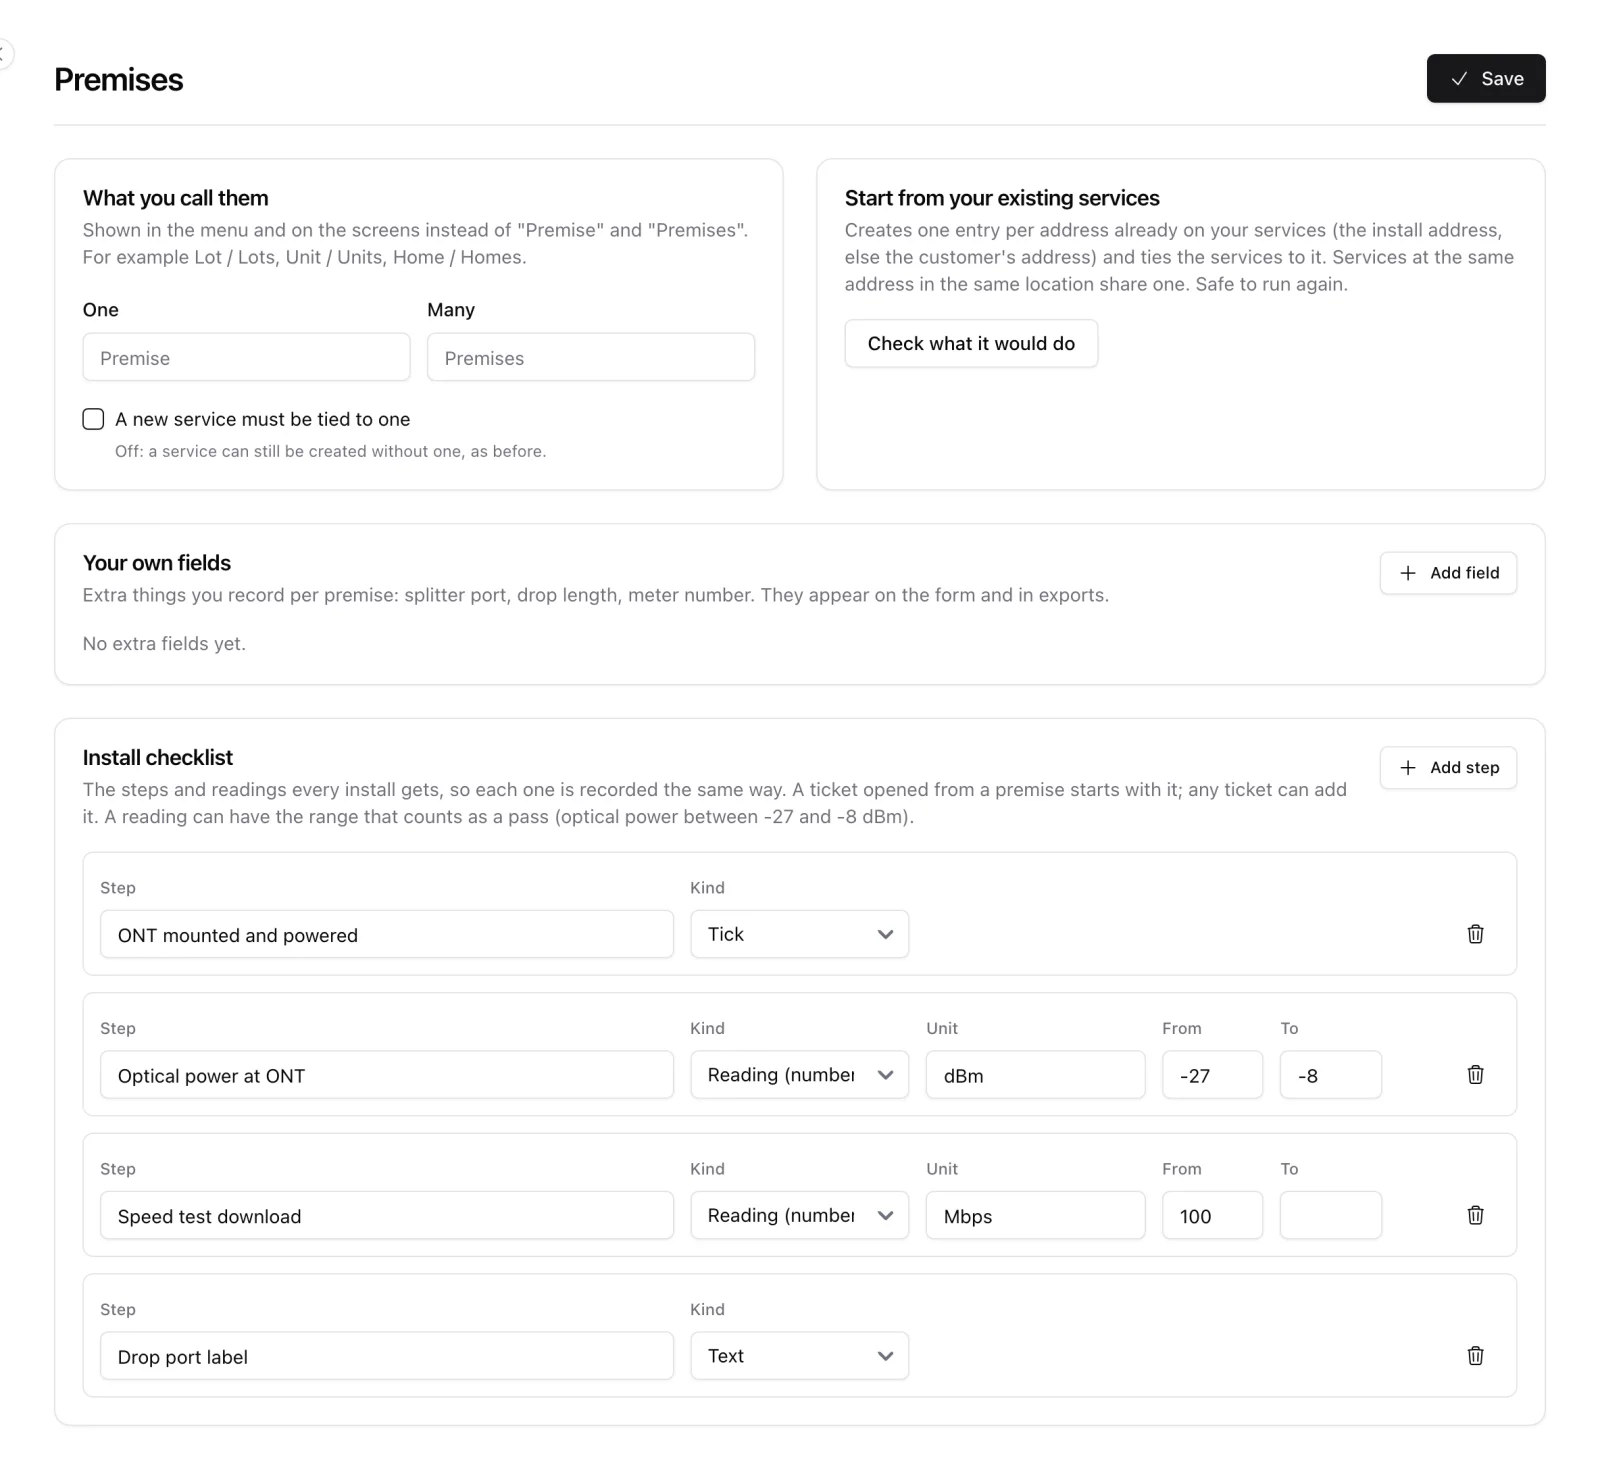
Under Settings > Premises, the card Start from your existing services creates one premise per address already on your services and ties the services to it. Check what it would do shows the numbers first and writes nothing. An address where several different customers are active (a park's office address typed on every guest) is left alone, because it is not one place; create those as lots with "Add many" and tie them by hand. It is safe to run again.
9. Make it yours
- What you call them - show "Lot / Lots", "Unit / Units" or "Home / Homes" in the menu and on the screens instead of "Premise / Premises".
- A new service must be tied to one - turn it on when every service has to have a premise.
- Your own fields - extra things to record per premise, such as splitter port or drop length. Text, number or a list of choices.
- Install checklist - the steps and readings every install gets. See Equipment at a Premise.
10. Labels with QR codes
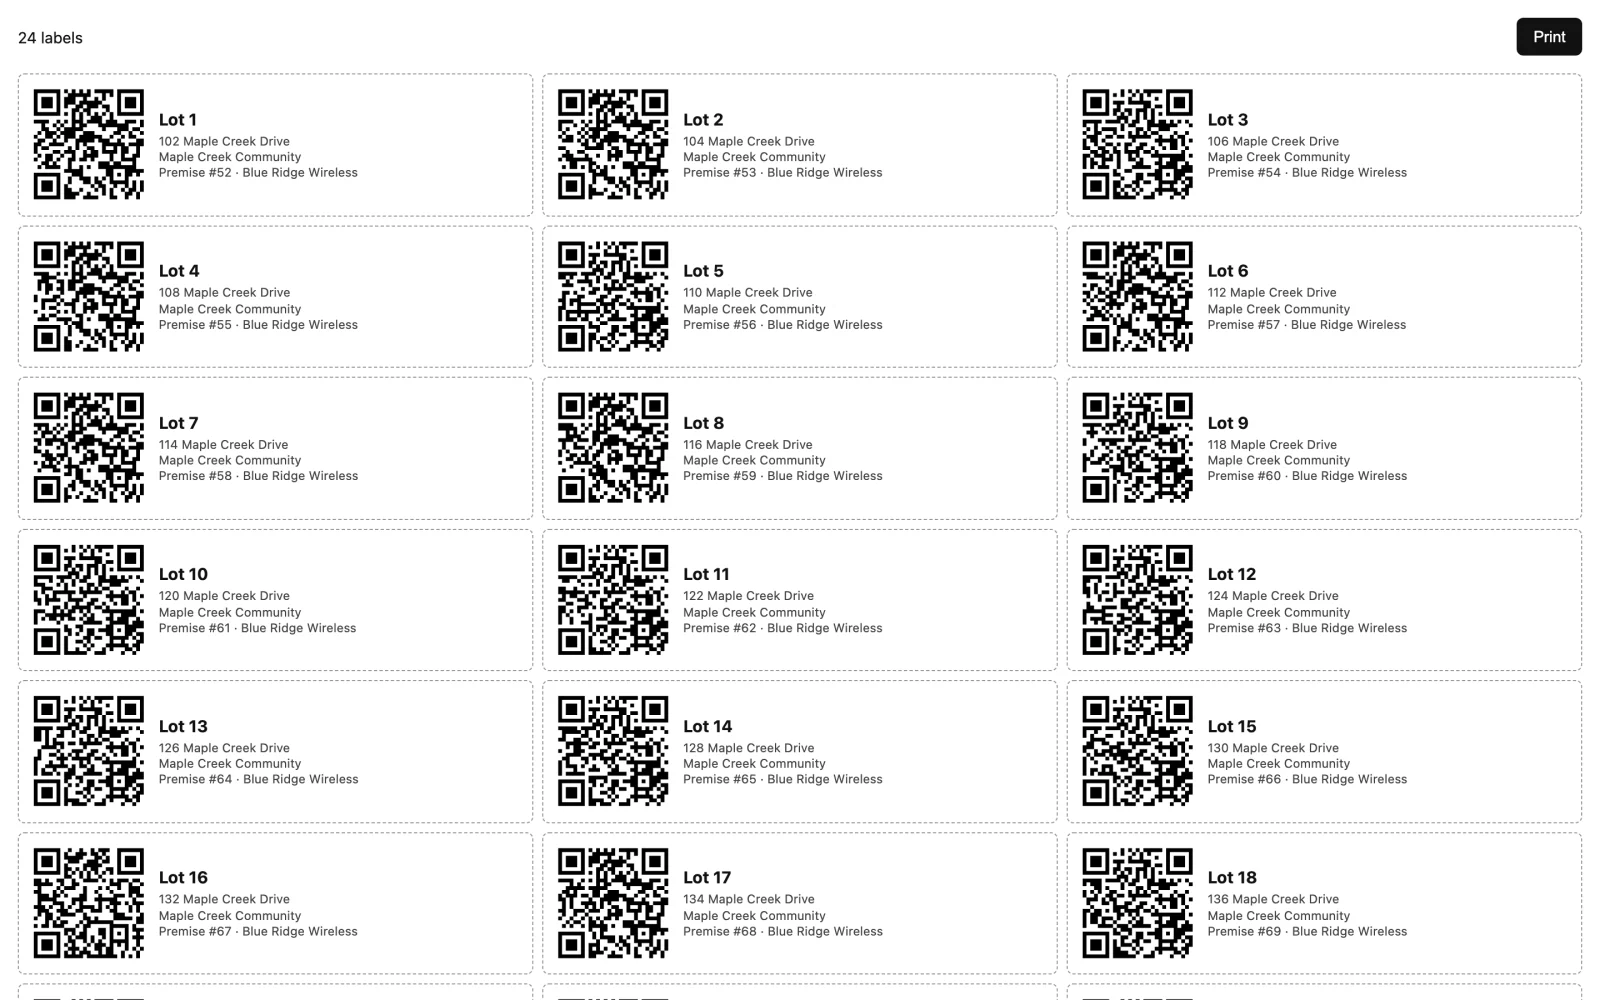
Print labels opens a sheet with one label per premise in the current filter. Scanning the code with a phone opens that premise's page, so a technician standing at the box knows which address it is and what is installed.
11. Where else premises show up
- On the customer's page, under each service: the premise and its access notes.
- On a ticket: the premise it is about, with a link.
- On a lead: when the address typed matches exactly one premise, the lead points at it.
- In Reports > Built vs Connected: ready, active and vacant premises and the take rate per location, with a month by month trend. The premise page shows since when it has its current status.
- In webhooks:
premise.created,premise.updated,premise.status_changed,premise.deleted. Premises added in bulk do not fire one webhook each. - In the AI assistant: search premises and look one up with its customers, equipment and network status.
- In the REST API:
/premises(scopespremises.readandpremises.write).
Permissions
premises.view lets a person see premises; premises.manage lets them add and change. Admins have both, Staff and Technicians can view by default. Change this under Settings > Users > Roles & Permissions.