Equipment at a Premise
Install an ONT at an address before anyone orders service, let it pass to the next resident when one leaves, check it is alive on the network, and keep the install readings.
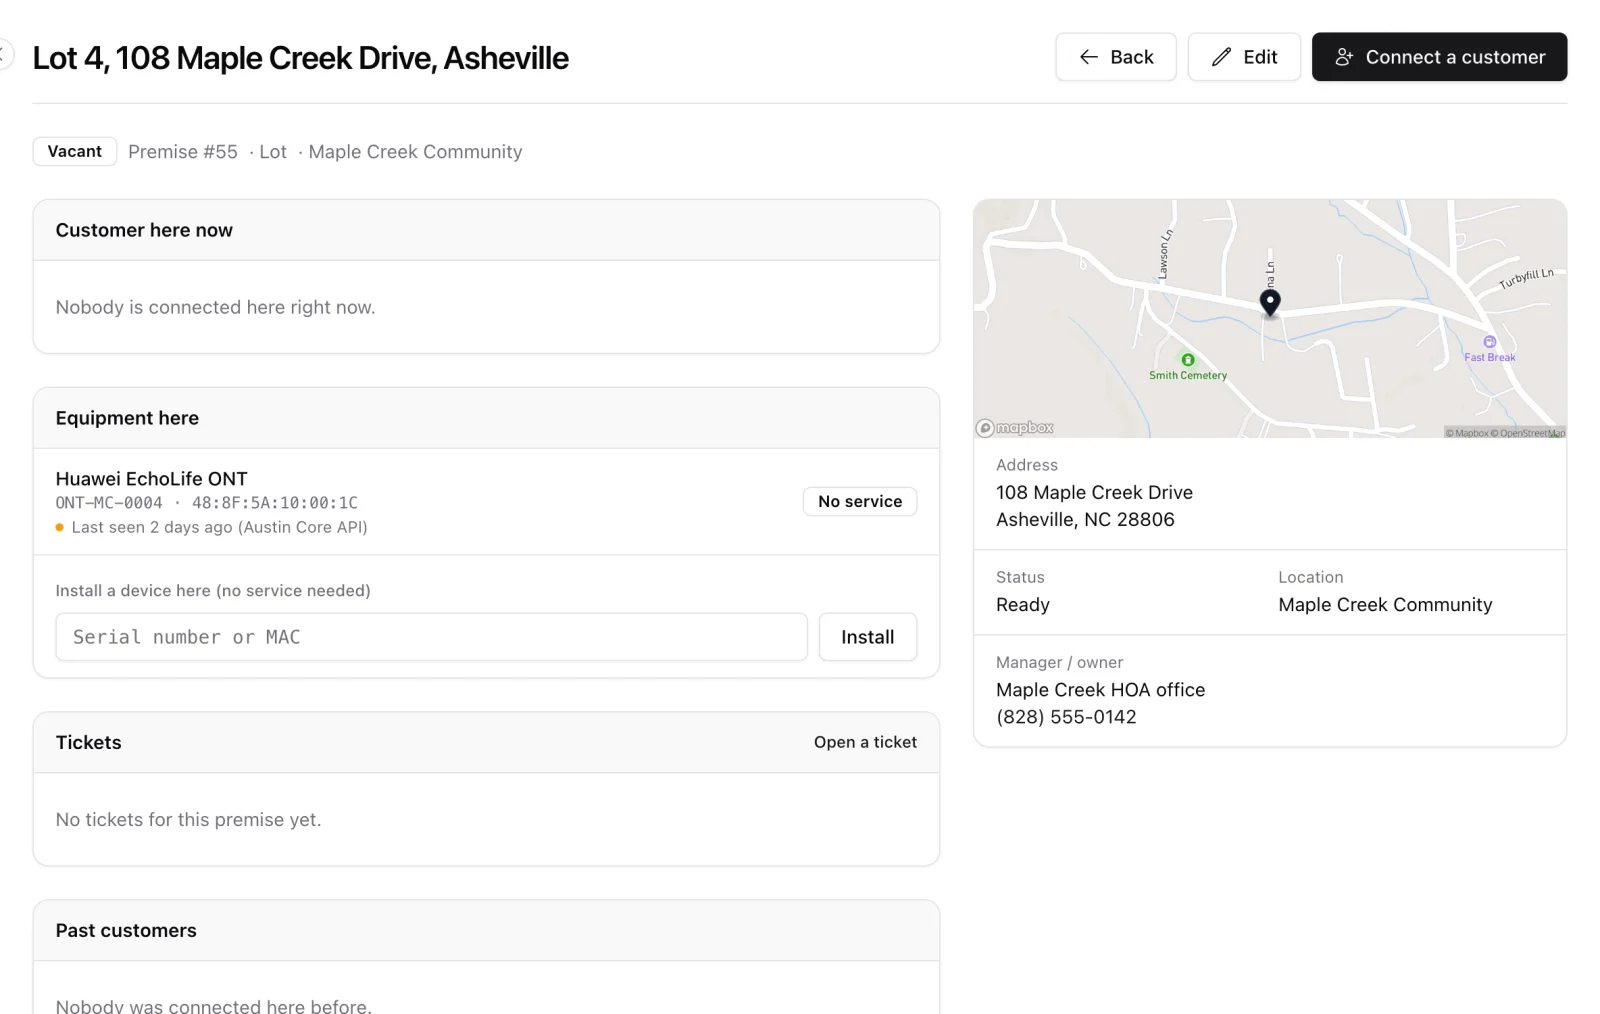
Some equipment belongs to the address, not to the customer. An ONT is mounted in every home while the community is being built, months before anyone orders service. When a resident moves out, the ONT stays on the wall for the next one. This guide shows how to record that: a device installed at a premise with no service, what happens to it when a service starts and ends, how to check it is alive before you promise service, and how to keep the install readings.
It builds on Premises and on Inventory.
1. Install a device at a premise
Open the premise and find Equipment here. Type or scan the serial number or the MAC address of a device that is in stock or with a technician, and click Install. The device leaves the stock or the technician's hands and is recorded at this address with the status "At premise, no service". No customer is needed.
You can do the same from the device's own page in Inventory with Install at a premise, and through the REST API (POST /premises/{id}/install-unit with a unit id, a serial number or a MAC address).
The movement is written to the device's history and to Inventory > Movements with the premise, the person and the time.
2. When a customer orders service
Create the service at the premise (the Connect a customer button on the premise page, or the premise field on the service form). Every device that sits at that premise without a service is attached to the new service by itself. You do not pick it again and the technician does not need to visit.
If a device was installed after the service started, the premise page shows Attach to the service next to it.
When exactly one device with a recorded MAC address waits at the premise, the new service form offers that MAC for the service's login, with a note saying where it came from. Change it if your router sees a different address, for example a router behind the ONT.
3. When the service ends
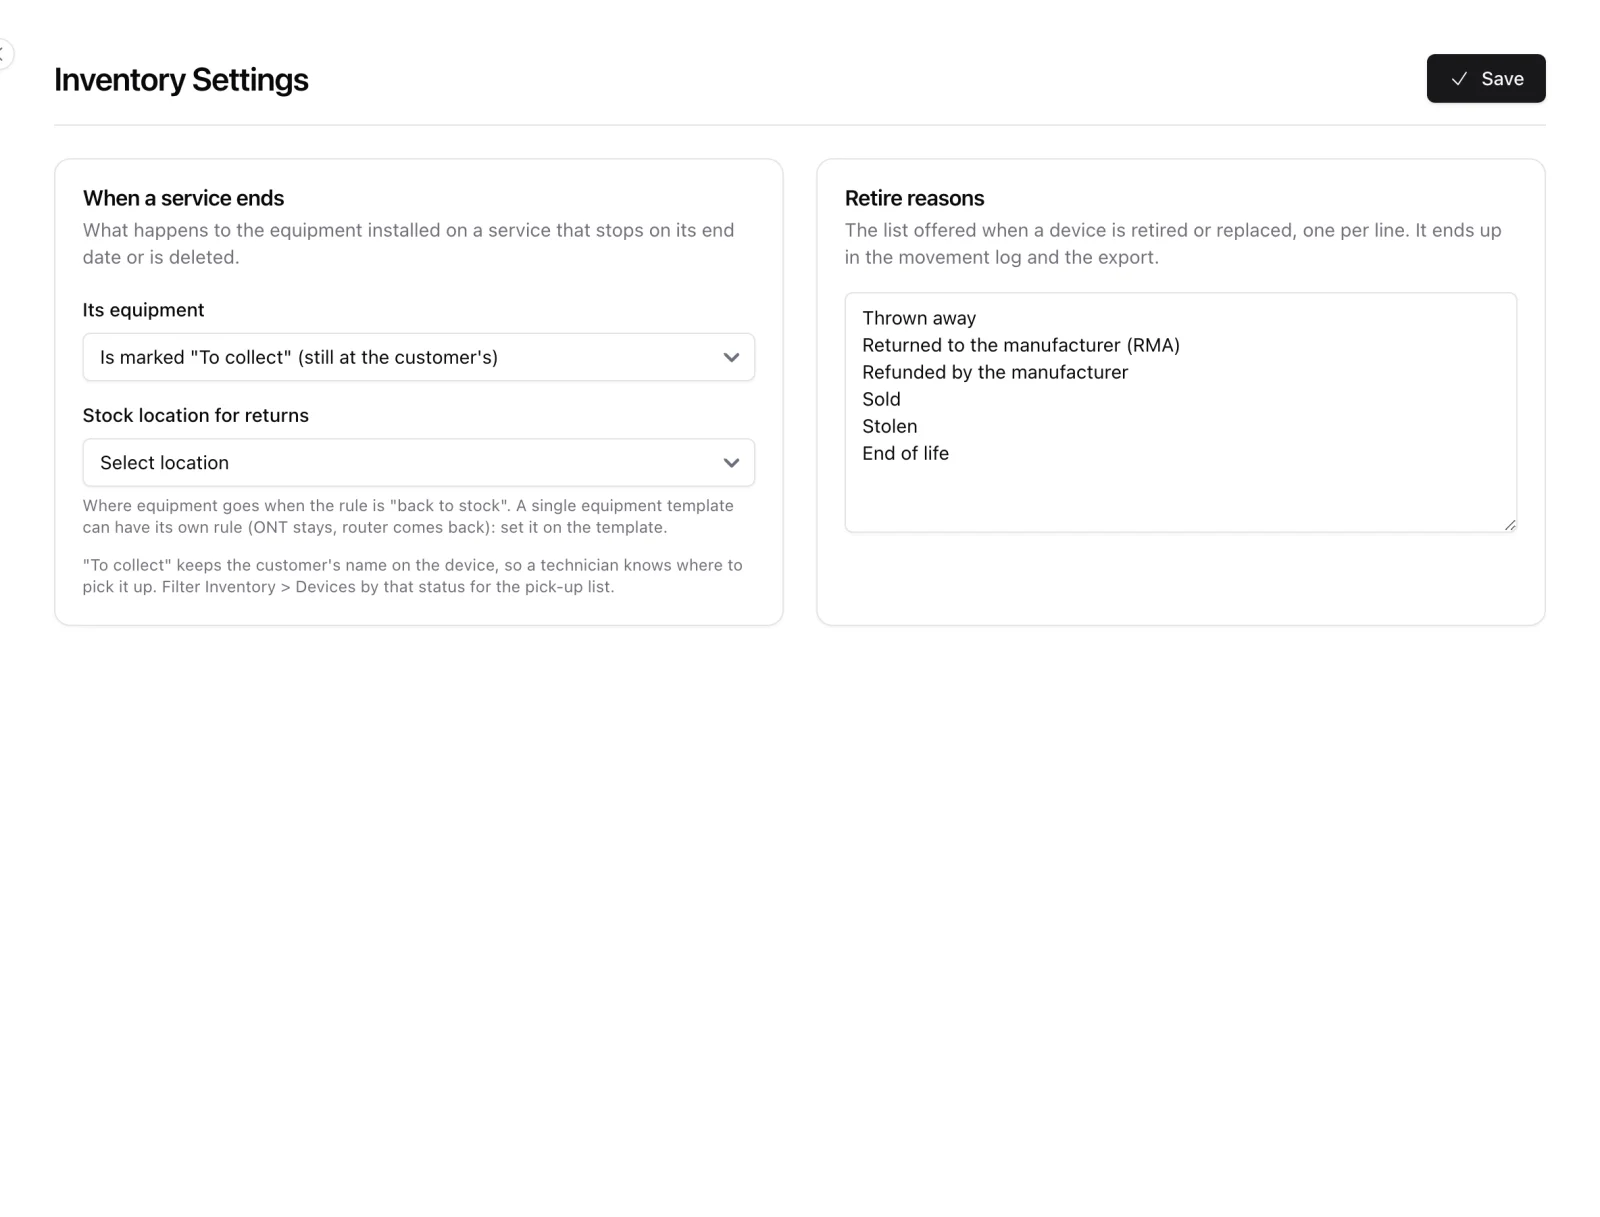
Under Settings > Inventory > When a service ends you choose what happens to the equipment of a service that stops on its end date or is deleted:
- Stays installed at the premise for the next customer - the device comes off the service and stays at the address. Use this for ONTs and anything wired in.
- Is marked "To collect" - still at the customer's, on the technician's pick-up list.
- Goes back to stock at a location - straight to the stock location you pick.
- Stays on the ended service until someone moves it.
Equipment with the rule "stays at the premise" also comes off a service when a staff member switches that service to Inactive on the service page, and goes back onto a service at that premise when one is switched on. A seasonal pause or an agent's temporary suspension is not an end: the equipment stays on the service. The other rules wait for the end date or for the service to be deleted.
One rule rarely fits every device. On an equipment template (Inventory > Catalog) you can set its own rule, so the ONT stays in the home while the Wi-Fi router is collected. A service without a premise cannot leave a device "at the premise"; in that case the device is marked "To collect".
Moving a service to another premise
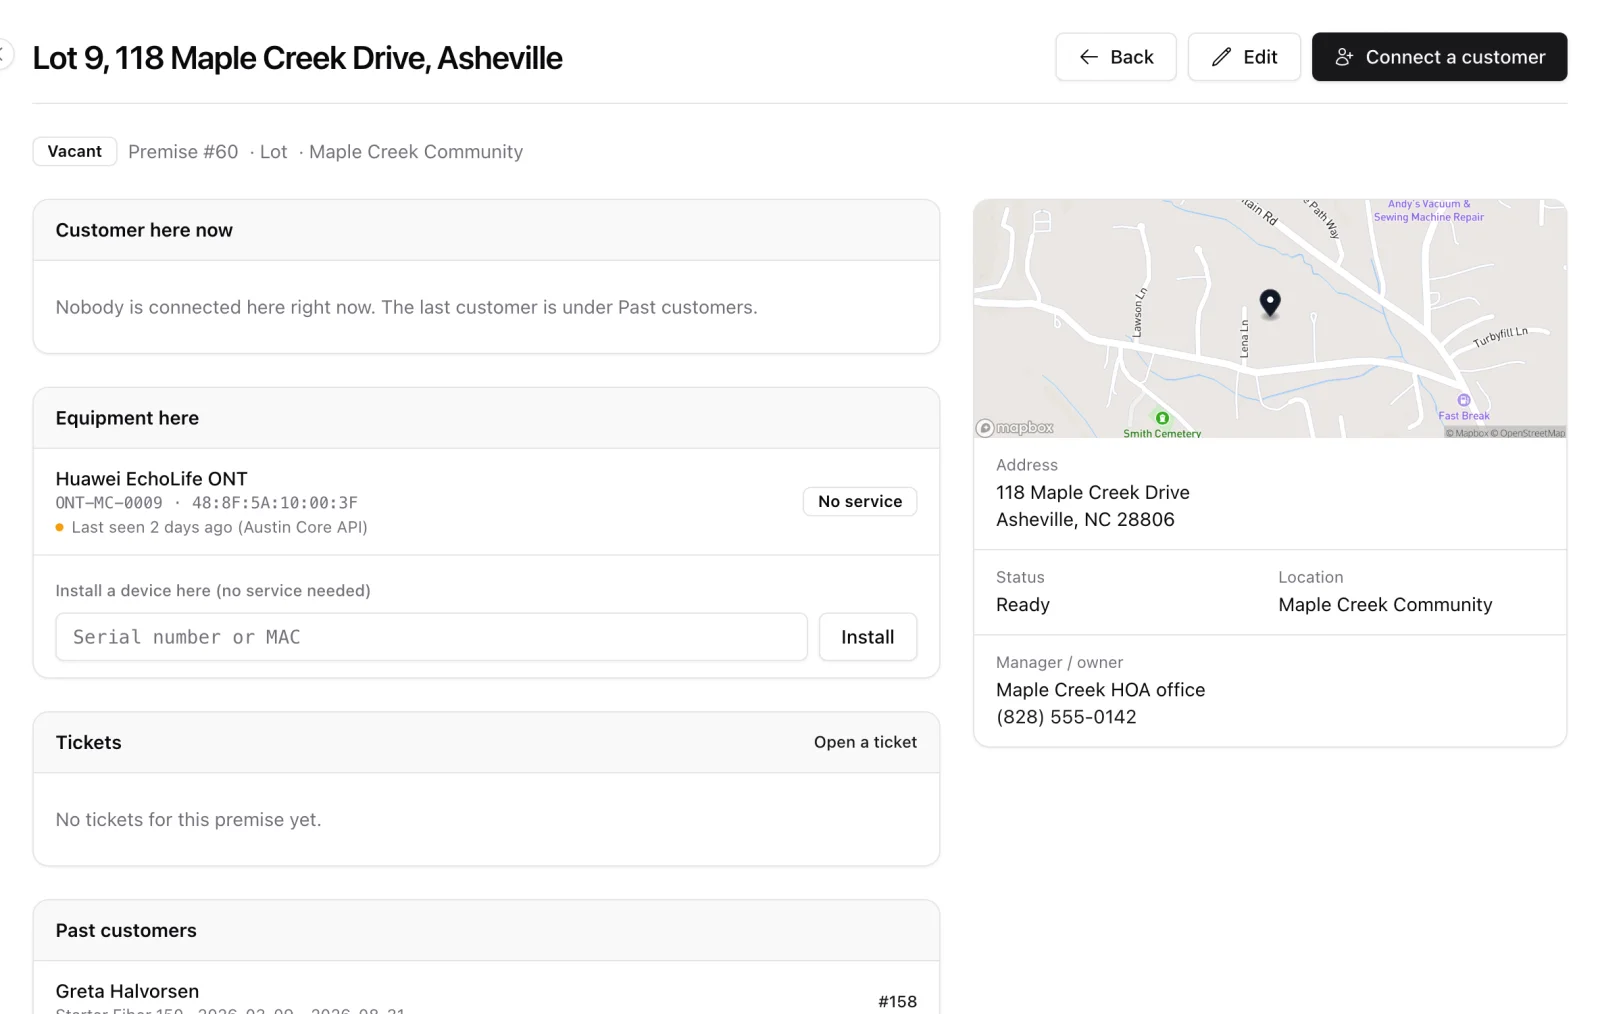
On the service page click Change next to the premise and pick the new one. If the service has equipment, ISPBox asks what happens to it: The equipment moves too, or It stays at the old address. When it stays, the devices are left installed at the old premise for whoever comes next, and any device already waiting at the new premise is attached to the service.
4. Is the device there and working?
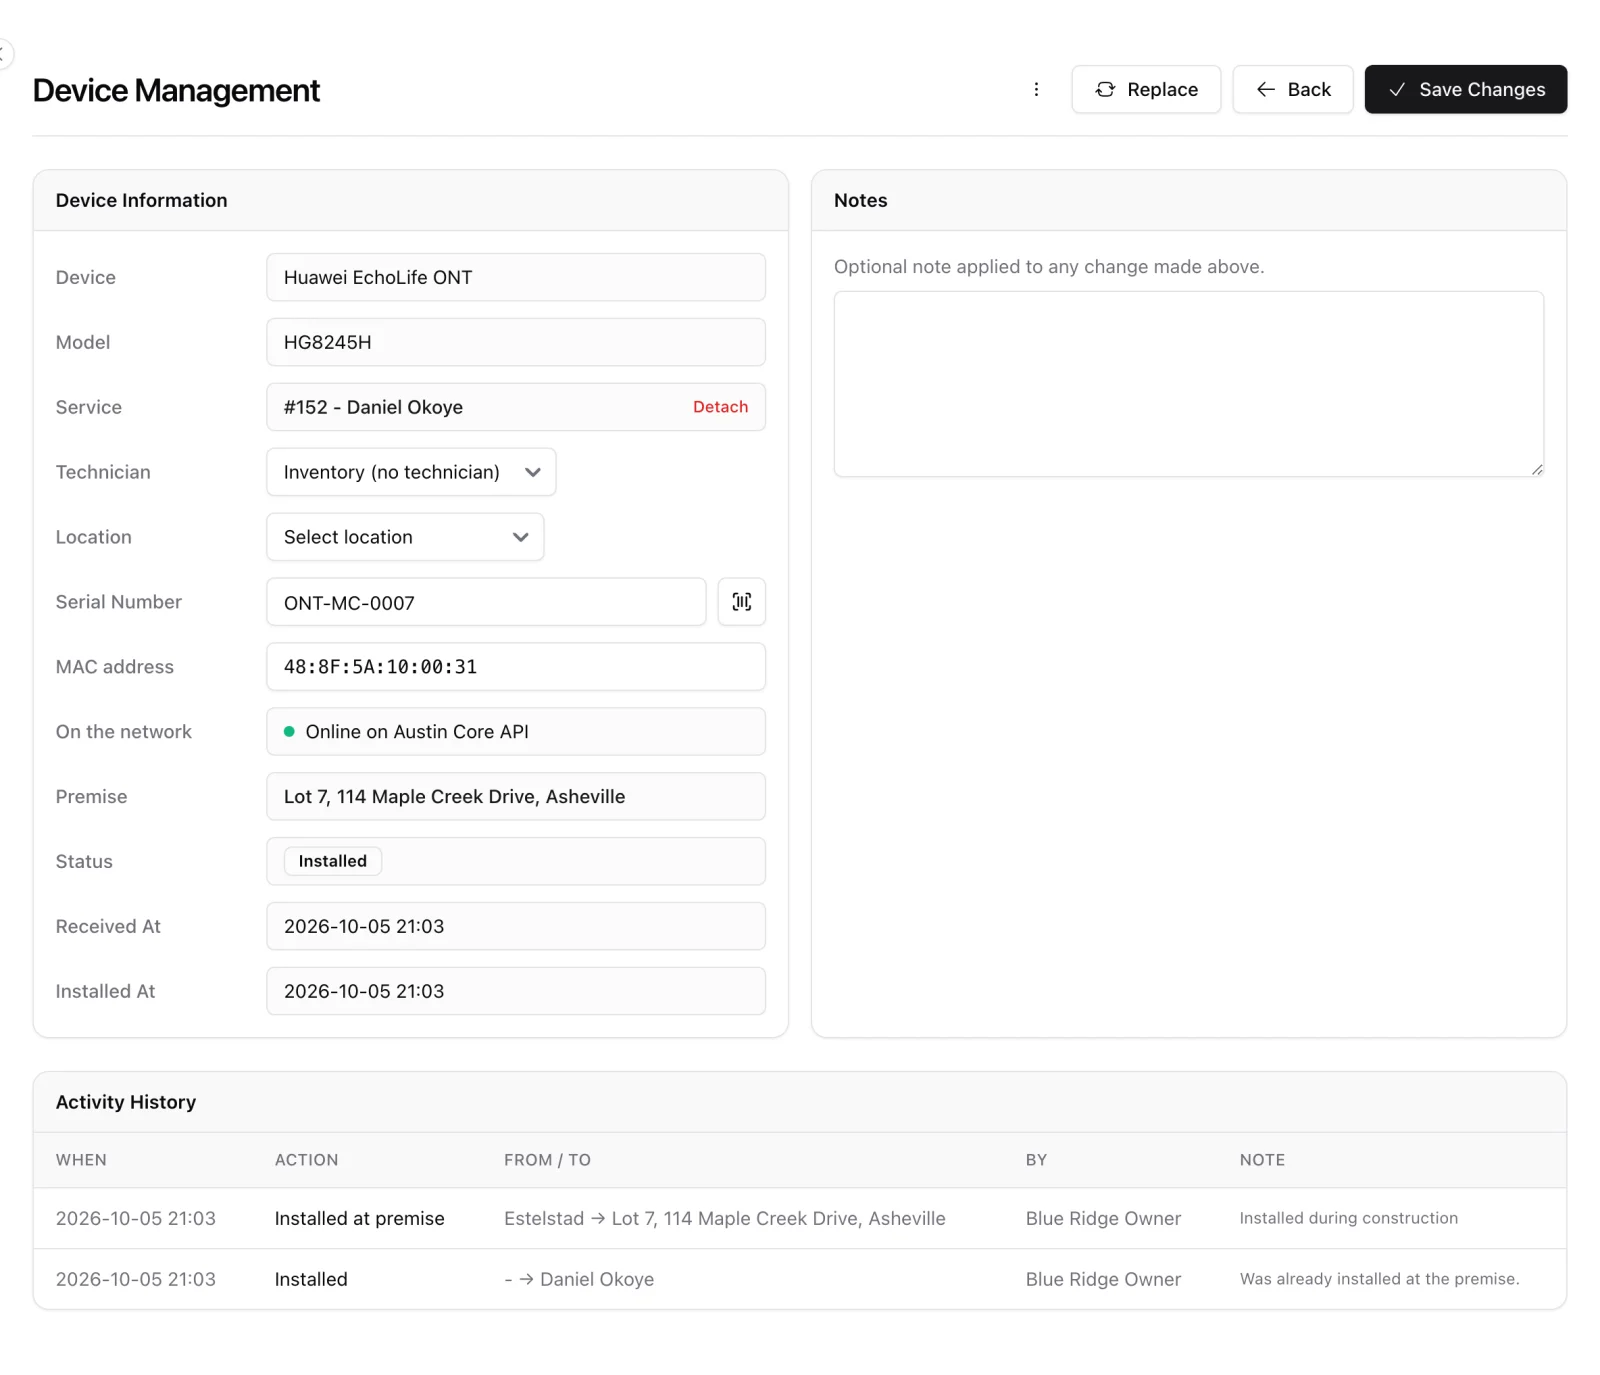
Record the MAC address on the device (on its page in Inventory). From then on the device page and the premise page show one of:
- Online on (router) - a router sees this MAC right now.
- Last seen (time) - it was seen before, not now.
- Never seen on the network - no router has reported this MAC.
The information comes from what your routers already report: devices found through DHCP (see DHCP Device Discovery) and the sessions of services that use this MAC. So before you tell a new resident "your service will be on today", open the premise and look at the dot next to the ONT.
This check works when the device's MAC reaches one of your routers. ISPBox does not read optical levels from the OLT and does not register ONTs on it; that stays in your OLT's own management system.
5. Install checklist and readings
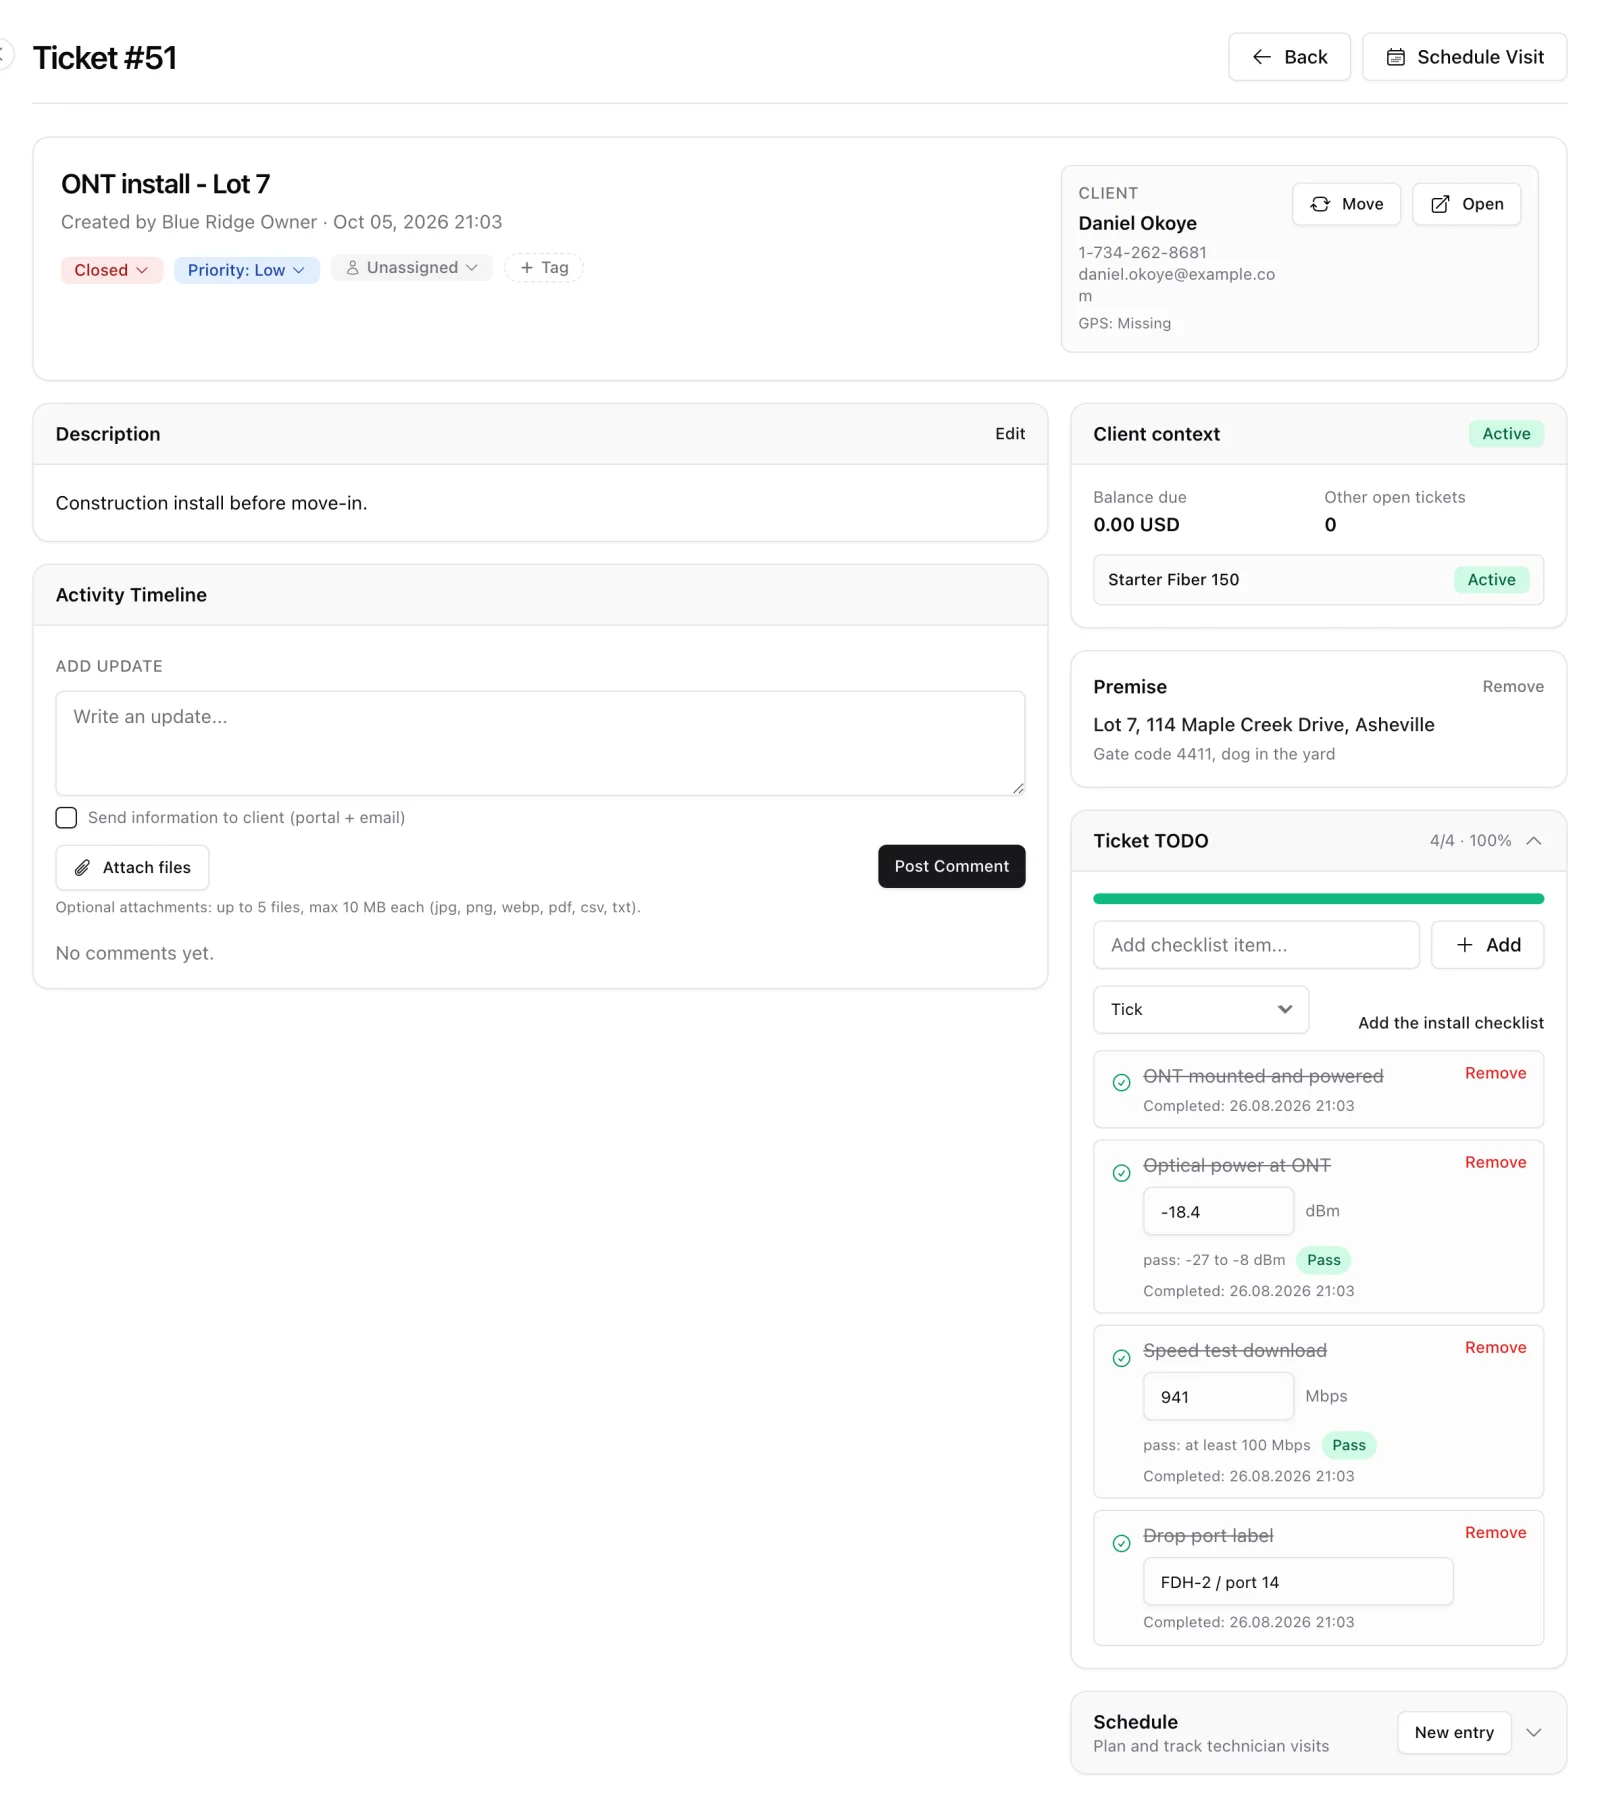
Under Settings > Premises > Install checklist you write the steps every install gets. A step is one of:
- Tick - done or not.
- Reading (number) - a value with a unit and, if you like, the range that counts as a pass. Optical power between -27 and -8 dBm, download speed of at least 100 Mbps.
- Text - a port label, a splitter name.
Click Open a ticket on a premise: the ticket is tied to the premise (and to the customer, when there is one) and starts with this checklist. On any other ticket, Add the install checklist adds it. The technician fills in the values; a reading outside the range is marked "Out of range". The readings then appear on the premise page under Tickets, so the next person at that address sees what was measured on install day.
6. Replacing and retiring
When a device fails, open it and use Replace: pick the new device, say what happens to the old one (to collect, damaged, at the vendor, retired) and why. The new device takes the old one's place on the service and at the premise in one step, and the movement log keeps both. Reasons for retiring ("Returned to the manufacturer", "Thrown away") are your own list under Settings > Inventory.
7. Reconcile what you bought with what is installed
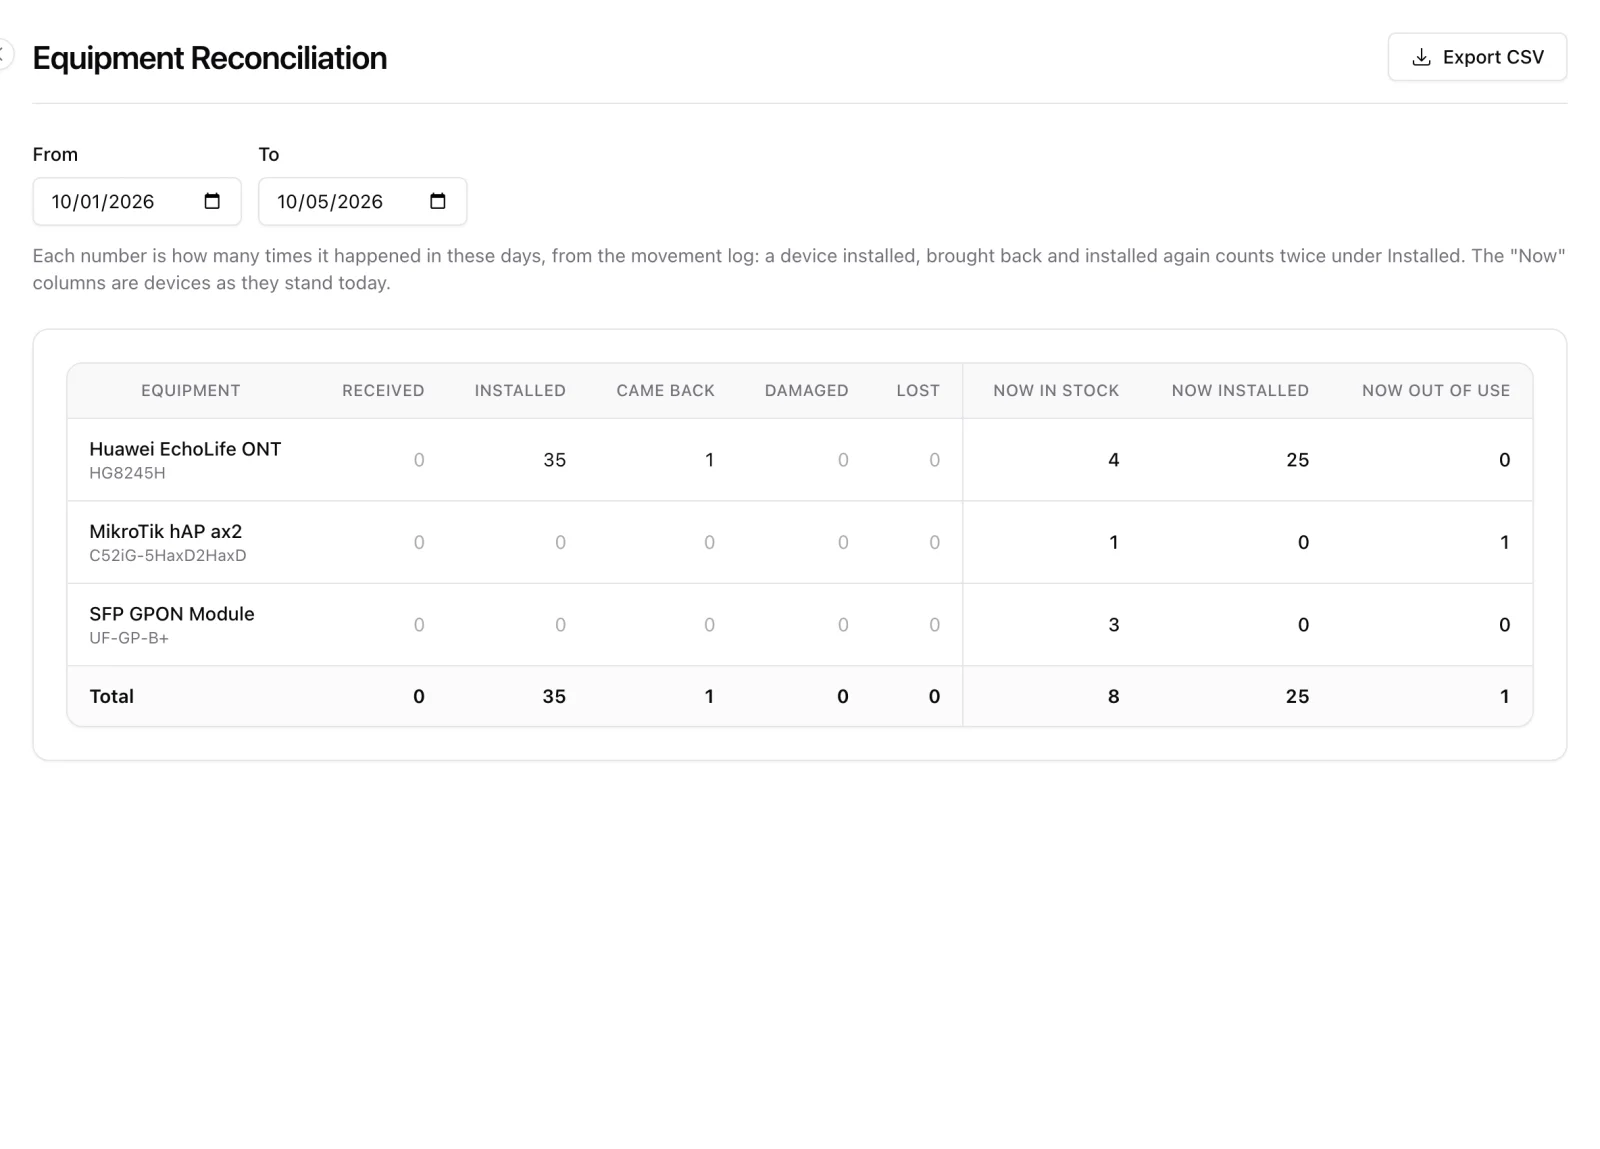
Reports > Equipment counts, for the days you choose and per equipment type, how many devices were received, installed, came back, were damaged, sent to the vendor, lost or retired, next to what is in stock, installed and out of use today. Each number counts movements: a device installed, brought back and installed again counts twice under Installed. Export it to CSV for the purchase reconciliation.
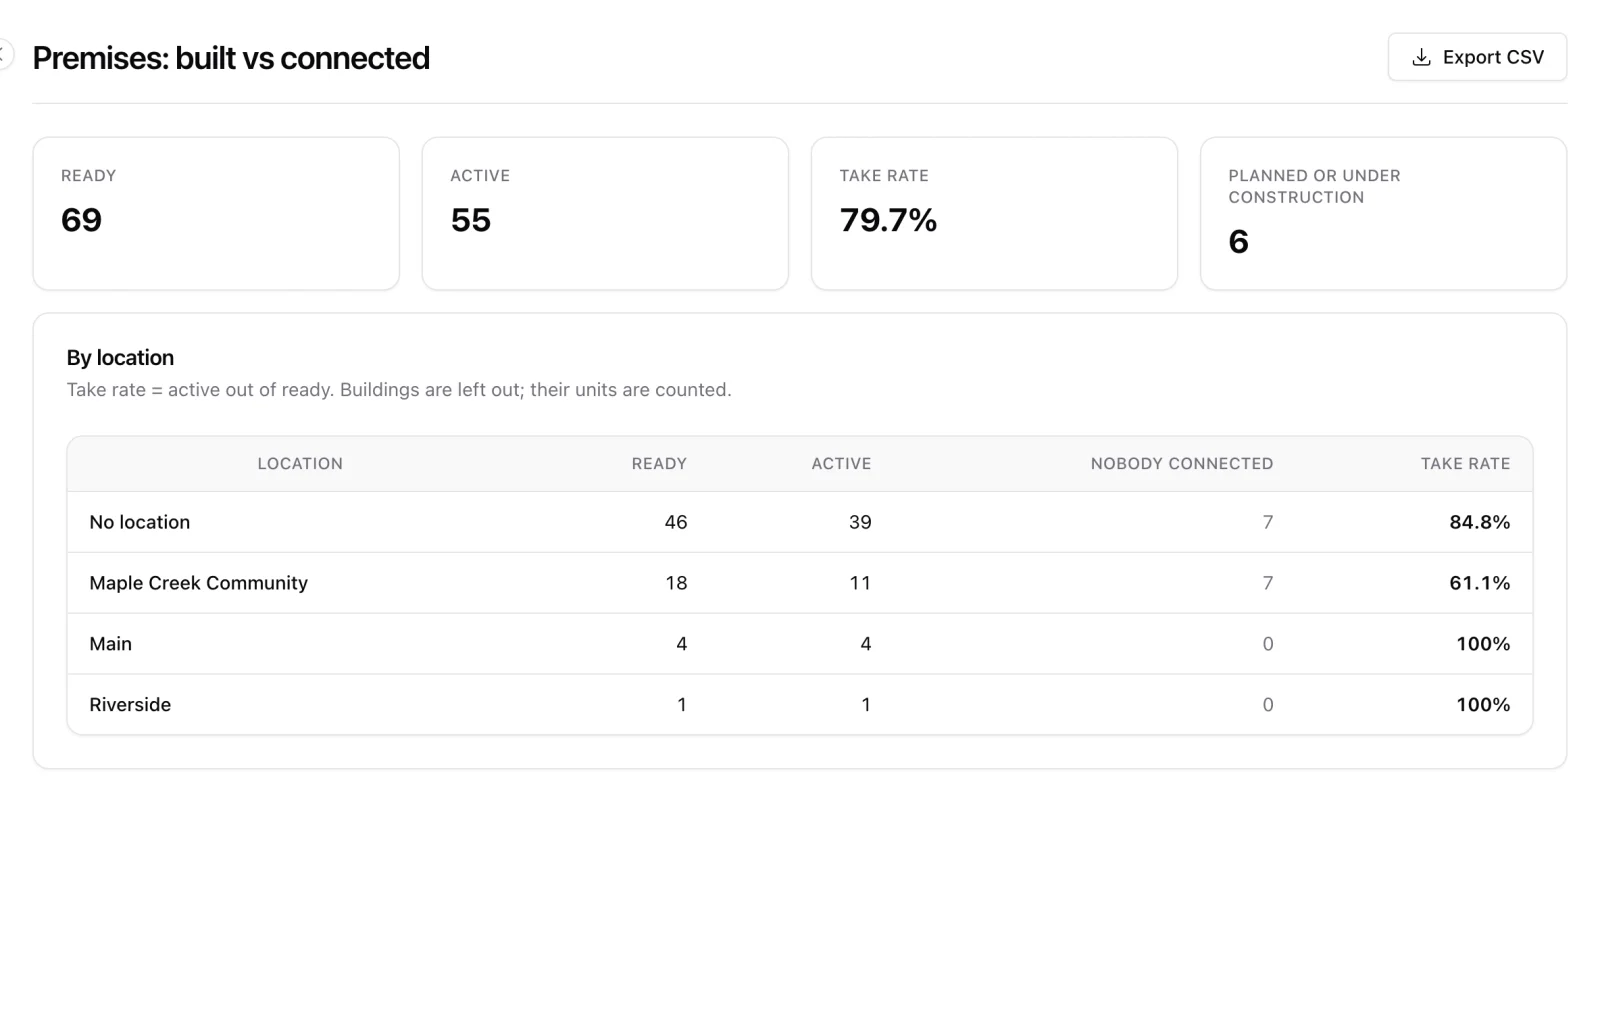
Reports > Built vs Connected shows, per location, how many premises are ready, how many are active, and the take rate.
A workflow for a new fiber community
- Create the community as a location and its homes with Add many, status "Under construction".
- Receive the ONTs into Inventory with their serial numbers and MAC addresses and move them to the installers.
- At each home the installer installs the ONT at the premise and fills in the install checklist on the ticket.
- When a street is finished, tick its premises and set them to "Ready".
- When a resident orders, connect them at the premise. The ONT is attached to the service; check its status first.
- When they cancel, the ONT stays at the premise and the premise shows as Vacant, ready for the next resident.